New to Diamond Painting? Have no fear! You're in the exact right place. And we're SO glad to have you!
What Is Diamond Painting?
Diamond Painting is a new craft hobby that's a mix between Paint By Numbers and Cross Stitch. With Diamond Painting, you apply thousands of tiny resin "diamonds" to a coded adhesive canvas to create shimmering Diamond Art.
Diamond Painting was introduced to North America and Europe by the Paint With Diamonds™ company in 2017. Since then, millions of crafters around the world have discovered the joy and stress-relieving benefits of Diamond Painting.
How To Start Your First Diamond Painting

Step-By-Step Diamond Painting Instructions
Step 1: Remove all items from the package.
Each Diamond Painting Kit comes with everything you need to get started. Take stock of your canvas, set of diamonds, toolkit, wax pad, and tweezers.

Step 2: Lay your canvas out on a clean flat surface or workstation.
Roll your canvas out on a perfectly smooth and flat surface. Kitchen and dining room tables work wonders. Advanced Diamond Painters head over to Amazon and search for crafting tables.

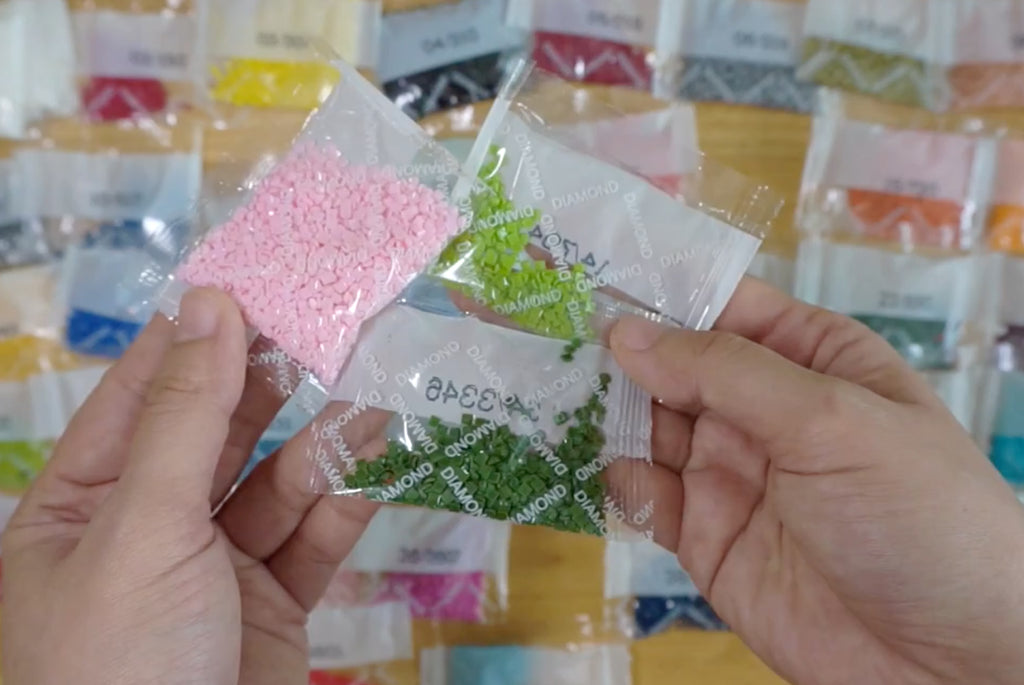
Step 3: Select a color or symbol and pour diamonds into the tray.
Determine which section of your Diamond Painting canvas you want to start painting. Select the appropriate diamonds and pour a small amount into the grooved tray. Shake lightly so that diamonds shift upright.

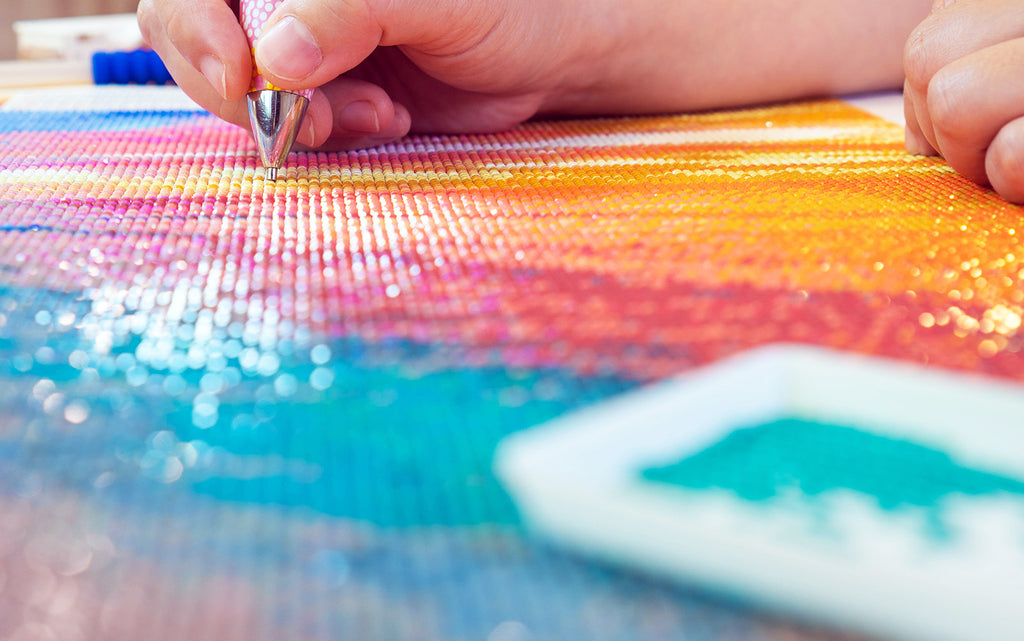
Step 4: Apply wax to the tip of your Diamond Pen.
Peel back the plastic film on the pink wax pads and apply a small amount of wax to the tip of your Diamond Pen. The wax acts combines with the static cling and acts almost like a Diamond magnet.

Step 5: Place each diamond in its corresponding square on the canvas
Each color diamond corresponds to a specific symbol or character on the canvas. Check the legend on the side of the canvas to figure out which symbol corresponds to each color. Colors are denoted using DMC threads. Peel back the protective film covering in small sections and begin painting. DO NOT REMOVE THIS PLASTIC FILM ALL AT ONCE.

Step 6: Repeat the process until you have shimmering Diamond Art!
Work your way across the canvas diamond by diamond until you have a gorgeous DIY Diamond Painting! To increase the longevity of your Diamond Painting, consider sealing it before you put it on display! Diamond Paintings were meant to be enjoyed from afar - take a step back and marvel at the beauty.

What's The Difference Between Round And Square Diamonds?

In Diamond Painting, you will often come across the terms "Square Drill" and "Round Drill." In Diamond Painting, a "drill" is simply another word for "diamond." So when we consider Round vs. Square Drill, we're referring to the physical shape of the diamonds.
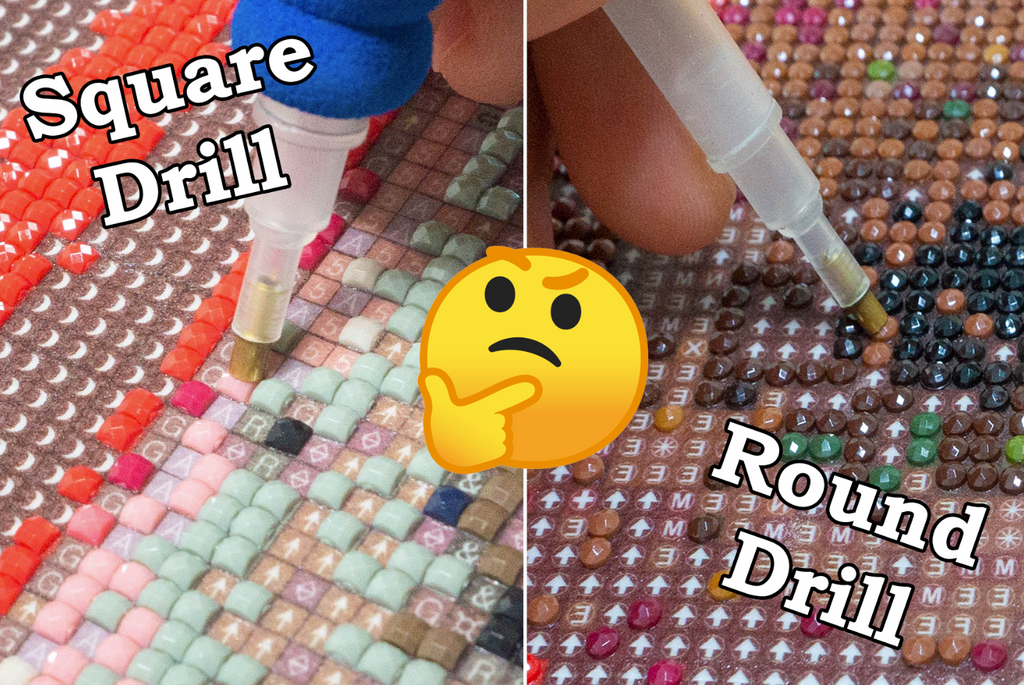
In choosing between Square and Round Drills, it's important to know that there are no right answers. Each has its pros and cons. Your goal should be to choose whichever shape that you think yields the most beautiful result with the most satisfying process.
Square Drill (aka Square Diamonds)
Creates A Fuller, More Complete Looking Painting.
Sometimes it's the little things that matter! When you start making progress on a Diamond Painting and begin filling in gaps, you get a satisfying "snap" as the diamonds settle snugly into place.
Round Drill (aka Round Diamonds)
Easier (And Faster!) To Pick Up And Apply Diamonds.Finished Painting Feels Less "Complete."
Given the round shape of the diamonds, gaps between diamonds may appear more apparent when you're close up with the painting. It's strongly recommended to view your Diamond Painting from afar!
Diamond Painting Popular Techniques
After placing thousands of diamonds, you may want to switch things up. The fine folks in the Paint With Diamonds Support Group have developed a number of different Diamond Painting Techniques and strategies that everyone can follow!
The Checkerboard Technique

Imagine the alternating black and white squares on a traditional checkerboard. Apply the same method to your Diamond Painting to mix things up a bit on areas with large amounts of the same color. The real upside comes when you fill in the gaps - SO satisfying when everything snaps into place.
"Row By Row" Method

If you have a large block on your canvas with the same color, flip your pen upside-down and get working with your Multi-Placer tool! Using the wider head, apply 3 or 5 diamonds at a time and go quickly Row By Row. This method ensures your diamonds line up easily.
"Color By Color" Method

This one doesn't require much explaining - just work your way across the canvas one color at a time! The downside here is that the exposed areas might get less sticky over time. But on the plus side, filling in all of the blank spots is that much more satisfying than going row by row, for example.
"Farm Plot" Method
Put yourself in the shoes of a farmer and divide up large blocks of the same color into little "plots" that you'll "harvest" on at a time! Are we stretching the metaphor too far yet? Keep each rectangle just wide enough that you can place 3 or 5 diamonds with the wide end of your Diamond Pen.
What Does Each Diamond Painting Kit Include?
Each Diamond Painting Kit comes with everything you need to get started!
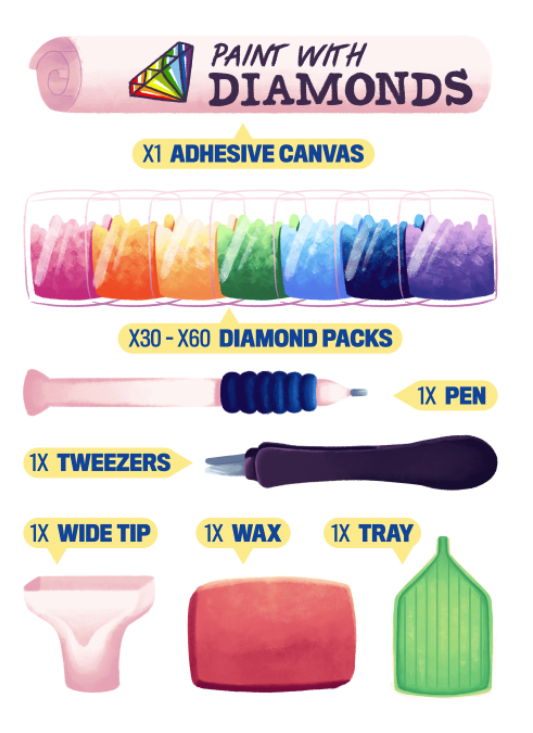
- Pre-printed canvas with design chart (with pre-applied adhesive)
- Color diamonds delivered in separate bags (labeled)
- Diamond pen tool
- Pair of extra-sharp tweezers
- Wax pad (used to pick up diamonds)
When ordering kits, be sure to pay attention to 1) where the kit is coming from and 2) how it's packaged. If your kit is coming from overseas, you'll want to be sure it's packaged securely for transit.
At Paint With Diamonds, we avoid common shipping problems by wrapping our canvases around foam noodles to avoid creases and plastic wrapping all canvases to avoid water damage.
Diamond Painting Tips & Tricks
Remove Canvas Creases And Imperfections By Applying Weight
If your canvas has creases, folds, or other imperfections in it, apply weight for an extended period of time. to flatten it out.
Option 1: Put The Canvas Under Your Mattress. Try using your bodyweight overnight to iron out any creases and wrinkles in the canvas.
Option 2: Put Heavy Books On The Canvas: The same principle applies here - simply apply weight in the form of heavy books for a day or two.
Option 3: Cut Out Creases With A Crafting Knife: If there are stubborn creases, simply lightly go over them with an X-Acto knife to release any air trapped between the canvas and its adhesive layer.
Get Crafty With Creative Storage Solutions
In Diamond Painting, organizing your diamonds is more than half the battle. If our conventional storage containers aren't for you, get inspired and come up with some DIY storage solutions!
Want more Diamond Painting Tips & Tricks? We've got a ton!
Embrace The "Oh Sh*t" Moments
It's the instance you see your diamonds falling to the floor, almost in slow motion. Or the horrifying feeling when your fur baby walks across your canvas. We call these "Oh Sh*t" moments, and in Diamond Painting they're more or less inevitable.

It happens. Here are some common remedies:
Paper / Fur /Dirt On Canvas: Grab a baby wipe and go over the area aggressively. The debris will clump up and roll away. Wait for the area to dry and resume applying diamonds.

Diamond Spills & Mixups: Pop some pantyhose or a t-shirt over your vacuum nozzle to suck up a spill! You can then choose to manually sort the catastrophe, or submit a claim for Oh Sh*t Insurance ;).

How To Display Your Finished Diamond Painting
From professional framing to DIY foam board displays, the sky is the limit when it comes to displaying your finished Diamond painting. You'll want to select an option that's appropriate for your budget and time constraints. Here are a few of our favorites:
1. Apply Stretcher Bars To Your Canvas
For more of a DIY approach to mounting, grab yourself a set of Stretcher Bars. The instructions are super easy to follow and result in a beautiful display with some added depth.

2. Mount Your Diamond Painting To A Foam Board
This technique involves a bit of measuring and cutting. Head down to your local craft shop (or Amazon) and find yourself a foam board. To create a flat, borderless painting, use box cutters to cut the foam board down to the same size as your canvas (not including the canvas border).

3. Use Magnetic Hanger Bars
This method is very low effort and can be done in a matter of minutes. Just grab yourself a pair of Wooden Magnetic Hanger Bars cut to the exact size of your Diamond Painting and clamp them to the top!

Check out our ranking of the 7 Best Ways To Display Your Finished Diamond Painting for more ideas!
Welcome to the Diamond Painting Family!

Comments
Susan Santiago said:
I am unable to upload my photo. Please help
August 29, 2024
Barbara Hoddinott said:
I bought containers of one color. I want to apply to a t-shirt. How do I make them secure?
August 29, 2024
Leah said:
The last three kits I have completed have an issue with drill popping up as I place subsequent drills. I push them down and others in surrounding areas pop up. I have tried rolling over them, etc. don’t seem to have this problem on other companies canvases. Any ideas?
August 29, 2024
Gary Gonzales said:
I sent an E-mail pertains to 2 missing packs of diamond drills. I haven’t had a response to the issue. I did the inventory and 2 packages were missing. Kit number PSDS-7572. Numbers 1 and 2. All other packages accounted for..
Thank you, Gary Gonzales
August 29, 2024
Lauretta Jones Rieker said:
Do the wax pens come.in a bundle.or are you.buying one pen
August 29, 2024
Richard Proctor said:
I am done several pictures and I enjoy the creation of the picture as it goes along
But I am having difficulty now getting the drills to adhere to the tool to place them on the canvas.
The wax doesn’t seem to keep the drills on the tool. I purchased the wax pencil and the drills do not seem to adhere that that pencil either
does the temperature of the room have any bearing on this problem?
Do you have any ideas on how to get the drills to adhere better? It is quite a bother to have to place them on the picture with the tweezers.
Please how can I overcome this adhering problem?
Richard
August 29, 2024
Pat said:
Would love to see some 4×6 or 5×7 paintings. Possibly one for each month of the year or inspirational words. Just a suggestion. Love diamond painting but the larger ones are sometimes overwhelming.
August 29, 2024
Pat said:
Would love to see some 4×6 or 5×7 paintings. Possibly one for each month of the year or inspirational words. Just a suggestion. Love diamond painting but the larger ones are sometimes overwhelming.
August 29, 2024
Lana Marie Kuehl said:
I received a kit for a Christmas present and it contains both round and square diamonds. How do I know which to use? Are there the same amount of round ones and square ones? I prefer round, but I don’t know how to determine which ones to use.
August 29, 2024
Sandy Kemp said:
So do you use poured glue or double faced tape on your canvases?
August 29, 2024
Peggy L Tobin said:
I’m on my 1st painting and I very got several, but there is no tweezers in any of them do you know y not and what I do about this? Thank you your amazing!
August 29, 2024
Valda Miller said:
I have finished my canvas which measures 30×40 cm, cut down to 25×35 cm. Can I get a magnetic frame to fit this size?
Also I found having a Light Pad, with my eyesight, was very helpful to see the numbers, especially on dark areas.
August 29, 2024
Phyllis Thompson said:
Sandy, you don’t have to do anything before framing your picture, however, I would advise to use mud podge on it first. That way it will protect the diamonds from falling off if you wanted to dust it.
August 29, 2024
Phyllis Thompson said:
Sandy, you don’t have to do anything before framing your picture, however, I would advise to use mud podge on it first. That way it will protect the diamonds from falling off if you wanted to dust it.
August 29, 2024
Phyllis Thompson said:
Margo, you don’t have to use the wide tipe. Use the other end of your pen to pick up your dills.
August 29, 2024
Phyllis Thompson said:
If you go into Google and ask them what the difference is between cm and inches they will tell you.
August 29, 2024
patricia diane mathy said:
I’ve ordered a lot over the past few yrs and love them all. I know I’ve racked up some points but each time I try to actually use them or check balance it asks to sign up for account. Wll duh I’m logged in my account and no where is there a screen,at least I can find, that I can redeem them???
I have a few more to order but first I need to get a response.
thank you
August 29, 2024
KAREN L NIECGORSKI said:
I LOVE DIAMOND ART. JUST WISH I COULD FIND A FASTER WAY TO FINISH IT! I FRAMED EVERYONE I DID! I JUST ORDERED A LIGHT PAD AND LOVE IT. WHAT CAN I PUT ON THE FINISHED ART TO MAKE SURE THE DIAMONDS DONT FALL OFF EVENTUALLY?
August 29, 2024
Frosty Poff said:
Wondering if it’s possible to convert cross stitch to diamond art?
August 29, 2024
Kaye LaFollette said:
How and where do I post a photo of a completed kit that I am very proud of?
August 29, 2024
Regina said:
How can I tell if the kit has the sparkly rhinestones?
May 17, 2023
Margaret Richards said:
I purchased PBS-010, i think I bought insurance, if not i need to purchase DMC-310. THANK YOU
May 17, 2023
Sharon said:
Hi full drill means whole background is filled with drills(jewels) part drill means just fill in the actual picture not the background .
May 17, 2023
Suzanne Hensley said:
How do you read the stock number that has a bar code that is on the packages to see what the picture is..
May 17, 2023
Marrie Saunder said:
great collection
May 17, 2023
Daniel Howard said:
Thanks for sharing useful post. you can go through diamond painting at https://paintwithnumbers.com.au/
February 06, 2023
Beverly said:
I have the giraffe with mother and baby item #J949. It was given to my 13 yr old niece who gave it to me after losing 6 bags of beads. Could you please tell me how I can buy them from you. The bead color # is 1-300, 3-310, 4-400,,10-902,11-938, and12-3371. Thank you
February 06, 2023
Linda said:
Lost the diamond chips to a painting is their anyway I can order them
July 13, 2022
Joan said:
Thanks for all the tips.I hope to get started soon.
June 09, 2022
Andrei. Penner said:
I JUST DID A BIG ONE IT TOOK ME ONE MONTH
June 09, 2022
Amaris Marte said:
Can’t wait to get my order
May 25, 2022
Lukas Nguyen said:
Thanks! for sharing the step-by-step information, I also like the video portions, helps a lot with learning…
April 04, 2022
Lukas Nguyen said:
Thank you, so much. I am about to start diamond paintings for the first time and this really is wonderful information to know! Keep up the great work…
April 04, 2022
Joyce said:
My friend gave me a Diamond Painting kit for Christmas. She lives in AK and during the long winter months, this is what she does. We live in Northern Maine and we, too, have long winter months. I didn’t think I would like doing this, but I love it. I finished my first DP and ordered three more…one is for my daughter who is a first grade teacher and needs a good stress reliever project. This is a good past time or hobby for anyone. The completed project is beautiful. The next two I make are for Christmas gifts this year.
February 01, 2022
Lukas Nguyen said:
Thanks for sharing such type of informative blog. I also like the video tutorial part…
December 21, 2021
john lucas said:
I like the technique involves a bit of measuring and cutting. It can really help for people like us. who are doing there best to learn diamond paintings. Heartful Diamonds is also a place who have huge collection of the diamond paintings.
October 29, 2021
Lukas Nguyen said:
great post
September 28, 2021
Hash said:
Where are the answers???
September 07, 2021
Margo Gipson said:
I’m new to this art, and would like to know how to use the tools. Some that I’ve gotten have wide-ranging tips. How do I use them, and the others? Help
September 07, 2021
Denise Scanlan said:
I am having problems with using the drill and wax when I get a new kit. The wax just won’t stick so I end up using one that does. Is there a trick to this that I am missing?
July 20, 2021
Sandy Sword said:
I am framing with glass. Do I need to cover with shellac or something before I frame it. Thanks
June 22, 2021
Tonya Ward said:
I would love to read the responses to submitted comments. How can I do this?
April 06, 2021
house painter West Auckland said:
This is really appreciated that you have presented this data over here, I love all the information shared. It will be very helpful to understand the what is diamond painting Great post to share!!
https://www.touchofclass.co.nz/
April 06, 2021
Stephanie said:
I have used bulls eye shellac on mine and it keeps the drills on the canvas amd also keeps it shiny
March 22, 2021
House painters Grey Lynn said:
This is really appreciated that you have presented this data over here, I love all the information shared. It will be very helpful to understand the what is diamond painting. Great post to share!! I found thishttps://housepainterauckland.co.nz/ Having loads of data, if possible do have a look
March 17, 2021
Deanna Aranyos said:
Do you need tto put anything on the painting to keep the beades in place during weather and humidity chaanges?
February 18, 2021
Carol P. said:
First time on your site., and love all of your helpful suggestions. Just did my first diamond painting. A lot of the comments above are some of the questions I would ask. Is there a list of the answers to these questions anywhere. I wasn’t able to bring them up. I.m confused on the numbers on the different colored diamonds in each kit. Are all the colors the same numbers, even with different companies manufacturing the kits. Someone told me they thought they go by DMC colors? Thank You,
Carol P.
February 12, 2021
Chris olson said:
When ordering how do you tell if the background has no diamonds or if the whole picture is completely covered in diamonds? I am very disappointed when the background has no diamonds.
February 09, 2021
Patricia Cochran said:
I can’t find anywhere what it means when it says “full drill” or “partial drill”. Can you explain that and tell me why one would use one or the other? Thanks.
December 16, 2020
larry j aguiar said:
I have two picture would to turn them into gift before x-mas i my sis lost first grand son over cancle, than my son for hois dauthyer hter fou x-mas like ro do them myself can i help
December 16, 2020