
Raise your hand if you've ever made a mistake when Diamond Painting ✋
Maybe your fur baby managed to roll all over your canvas. Perhaps you removed the entire cover all at once and your glue dried. Whatever the case may be, IT'S OKAY - we're only human.
So with this in mind, here are the 7 most common Diamond Painting mistakes that people make, and how to avoid them. Learn from other people's mistakes so you don't make them too!
7. Not Wiping Your Painting Down Before You Seal It

Before you go to seal your finished canvas, make sure to use a wet wipe or moist towel to give your painting a good once-over. Remove any dust or dirt before applying sealant, or you may get unsightly dust clumps (image credit: Sue Small).
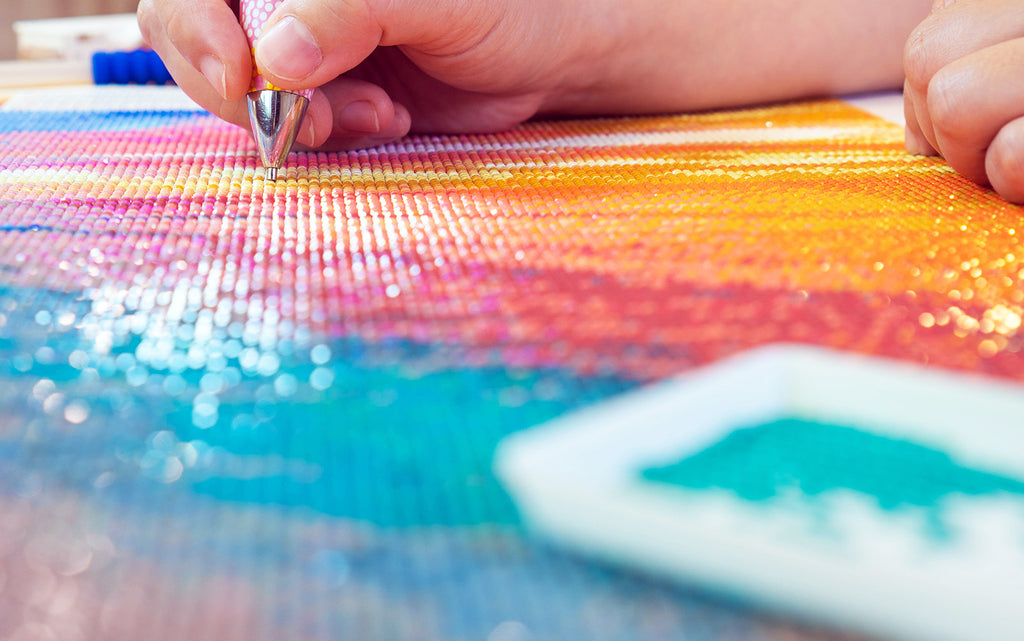
6. Allowing Fur Babies (Too) Close To Your Canvas

We have absolutely nothing against Diamond Painting with your fur babies keeping you company. But make sure they don't make a quick jump onto an exposed sticky area of your canvas, or you'll have to spend time de-furring your canvas (image credit: Sue Small).
PRO TIP: To remove hair, paper, etc. from your canvas, wipe down the affected area with a wet wipe or moist towelette.

5. Keeping Food & Drinks In Your Workspace

It's perfectly fine to have a snack when you Paint With Diamonds - lord knows I do! Just make sure to keep your workspace clear to avoid spilling any food or drinks on your canvas (image: Amber Lowrie).
PRO TIP: To remove small amount of liquid, just use a blow dryer on low heat to dry your canvas right up! If there are any spots that aren't sticky, just dab a touch of fabric glue on the area.
4. Not Closing Diamond Containers While Working

After you're done pouring out your diamonds, always close your diamond vials and storage containers! Avoid nasty diamond piles sticking to your canvas.
3. Resting Your Arm On Your Canvas

Have you ever found yourself unpeeling your forearm from your canvas? Lyndsey Hymes shares her tip for avoiding this sticky situation: "I took a section of parchment paper big enough for the side of my hand and laid it down so my hand doesn't stick to the canvas and move as needed ... works like a charm!"
2. Placing Diamonds On The Wrong Symbol

When you're in a groove, it may be a while before you take a step back and realize an entire area has the wrong color diamonds in it. The horror!
One way to avoid this mistake - when you turn a large painting upside-down to work on it, remember to also turn your sorter upside down to so you don't mix up similar symbols - like your 6s and 9s! (image: Cheryl Hope).
1. Removing The Entire Cover Paper All At Once

Of course it may be tempting to peel back the entire canvas cover to reveal the design hiding beneath. However, doing so will expose your canvas adhesive to stuff like animal fur, dust, or dirt, resulting in diamonds not sticking properly. Areas of your canvas may also dry out before you can even get to them!
To avoid this, we recommend removing the cover and working on your painting in rectangular sections. You also get a nice sense of satisfaction when each section is completed.
------
What did you think of our mistakes? Have you made any of these yourself? Any wise tips for your fellow Diamond Painters? Leave your thoughts in the comments!
Oh, and btw - if you ever make a mistake and you bought your kit from Paint With Diamonds, feel free to take advantage of our Oh Sh*t Insurance - free with every order!
Comments
Kathryn Murphy said:
I have been Diamond Painting for about 3 years now. I’m hooked for certain! I do purchase canvas kits from many different sources, though PWD provides the highest quality! Since I do mostly large canvases, I may have some tips that will be helpful: 1) The more detail in the art, the larger should be the canvas. Small canvases, though, are great for art that has little detail; and these can be done as groupings. 2) Diamond shape is a matter of preference. But, whether large or small, they should always be checked for uniformity in the tray prior to placement on the canvas, and use a plastic tool that has two flat ends, for lining up the diamonds and getting your edges straight. I recommend doing this every 5 or 6 rows and columns. For square diamonds, I place my diamonds touching up exactly to the diamond on its right, using my flat tool to ensure even alignment. 3) To flatten a canvas, prior to working it, first flatten upside down, using heavy books or magazines stacked on top. For some canvases, it can be a painfully long wait of a week. Then turn right side up and flatten from the front side. 4) Using a hair dryer on LOW works well to make the glue on the canvas sticky again, but you can also use a clear glue applied through a thin nozzle or by a narrow paint brush for larger areas – just wait about 1 minute for it to become tacky before applying diamonds. 5) I use a dry, clean, 4" wide paint brush after I have completed the canvas to remove any dust, debris, or excess glue from the painting. 6) Use a wide brush to apply your sealer , brushing first one direction, and then the opposite direction to get into all the crevices; try to use as few strokes as possible. Also, it should not matter too much which brand of sealer you choose to use; if you apply it thinly, you should not lose any sparkle.
Happy Diamond Painting!
August 29, 2024
francine mahoney said:
I just started doing diamond art. So far I love it. I also love reading all tips . I find them useful.
August 29, 2024
Pat Van Vreede said:
I put the diamonds in small square containers ( Amazon ) and number the tops with a pen. Eliminates bags.
My Husband made a wood piece for under the tray. Its so light, the wood stabilized the tray. I bumped it and spilled too many times. Works great.
August 29, 2024
Kinsley said:
I have been doing Dimond art for 9 years and I have a bunch of them but I don’t know what to put on top without ruining the sparkle. I’ve tried mod podge but it made the sparkle go away so I have no idea what to do next. ❇
August 29, 2024
Sue Fisher said:
To remove creases from the canvas, I put it between two pieces of heavy cardboard. I slide the cardboard between my mattress and box springs. In a few days the canvas is flat. I usually order 2-3 DP’s at a time and remove them one at a time, leaving the rest under the mattress.
August 29, 2024
Julia said:
I have a tip. Before I start my Diamond art I peel the clear film off. I put the canvas on a piece of cardboard then use clips to pull it straight and hold it in place. I then cut my plastic film into four sections. I work on a section at a time so my adhesive doesn’t dry up and my dogs fur doesn’t get all over it while I’m working. You could even cut the film in half. Whichever you prefer. Thanks for the tips. I wish I had read them when I started a few years ago.
August 29, 2024
Diane Fulbrook said:
So many people are asking what to use to cover the finished painting. Look further on the company’s you buy your paintings from and they should have the products to use. Also I cannot find the perfect frame sizes in my stores in Canada. So what I use to fill in the sides of the pictures is ribbon that complements my pictures. Works very well. Also as I have said previously , buy baseboard edging and I also use foamboard from craft stores and cut it to the perfect size for the frames you buy or your husband happily makes for you.
August 29, 2024
Mary said:
When I get my new project. I put all my diamonds in small sealing bags that are lettered and place them in a container in order.
Now I am finding it hard to take the diamonds out of the bags. I have placed them together by project.
August 29, 2024
Sonya Derossi said:
I have been doing this for years and I must say, none of the diamond paintings I have bought ANYWHERE ELSE compare to Paint With Diamonds brand and company. I will never buy anywhere else, I think I currently have 20 …
Also, just so you know – I bought a router, mitre saw, and wood to make my own frames and it was less than $1,000.00 which is what I paid for 4 frames with mattes…I now buy my own wood, cardboard and have a matte cutter, so I am fully functional on my own. I normally give these as gifts, and donations to charity events. I have several I put up for various holidays and the custom ones are very nice too! love this place!
August 29, 2024
Marge said:
I use some of the old paper to place under my hand or arm. It’s less expensive than buying parchment paper. Really enjoy diamond painting
August 29, 2024
Ana V Dery said:
I am using a lint remover, the sticky paper kind to recover all my fallen beeds of the carpeting
August 29, 2024
Bonny said:
How do you get the diamonds to stick to the end of the pen. I have tried the wax and it’s not working.
August 29, 2024
Christine Zingerle said:
I have almost finished a custom piece and ran out of 2 different colors. How can I order more.
August 29, 2024
Emma said:
This is basic common sense really as apossed to tips. The only thing I find a pain when doing these, is flattening the picture before i start, obviously we all do that, but getting them pesky creases out is a pain, I did have trouble with rhinestone not always sticking so good in areas, but, that soon sorted out with a bit of ‘Tack it Over and Over ’. Also I wish that some of the painting didn’t come with clear plastic over the painting, as this makes it a real pain to remove small sections at a time, where as when the covering is white paper, at least you can see what you are working as you go. Been doing Diamond Art for nearly 12 years now and have such a huge catalouge of pictures, some I have sold, some have been gifts, some I have mounted and hung, some are in my portfolio, they are just so addictive and send me to a peaceful place.
May 17, 2023
Anneliese Young said:
I love all the tips thank you for sharing.
I purchased a light board from Amazon. It’s a game changer when doing Diamond painting.
May 17, 2023
Tina said:
I accidently sprayed my diamond painting with white paint thinking I had clear sealer. What to do now? It’s already dried.
May 17, 2023
Meghan said:
I 100 pack of 4×6 pieces of parchment-like paper. On a smaller diamond painting (dp), like a 11×16, I take off the entire cover and cover it back up with the smaller 4×6 pieces. That way I can move around and try and do all of 1 color at a time. I much prefer it that way!! On the larger ones, 4ftx3ft, I take 1 strip off at a time and do the same thing – same concept. I feel like it’s a time saver. I finished the rustic looking flag that is huge in 2 months.
May 17, 2023
Patti Lisenbee said:
I’m on my third diamond painting – Van Gogh’s Starry Night in square drills. I’ve discovered I don’t like square as much as round and have trouble when one doesn’t line up perfectly. It is turning out beautifully but I am much slower with squares.
I bought a case with bottles in it; I put the drills in one bottle per color (unless there’s a lot more of one color, then I use more bottles) and write the numbers on the bottle caps. I also use a cap for the drills I’m using, so if I spill, only a few spill instead of a whole bunch. I also use magnetic poster frames (top and bottom pieces only with hanging string attached) and it looks great!
I also use a lighted drawing pad to show me the numbers/symbols on the canvas. I learned to use a needle and clean out the old glue from the tip of the placing pen before I poke it into the glue square and that makes the glue last longer. You won’t have clumps of glue around the sides of the pen, this way.
I really enjoy diamond painting. I thought it was stupid at first, but a friend of mine posted a pic of her next project, so I decided to try. I fell in love fast and bought several more to do, with more on the way from this site, stained glass pictures. I can hardly wait for them, but as they are coming from China – ! I have a while to wait for them. Now I don’t think it’s stupid at all. But I’m going to stick to round drills, after this one is done.
May 17, 2023
Linda Poirier said:
I use a small paint brush to clean my canvas during and after completing project. Works very well to remove all kinds of stuff. I also clean canvas with brush before I use sealant. Works great.
May 17, 2023
Regina Maciejewski said:
Would appreciate answers to the questions. Is there a place to find them? Thanks. Regina Maciejewski
May 17, 2023
Lyne said:
Thanks a lot for the tips. I think I’m quite well organized. All the little diamonds stays in the little bags until I need to used them, and the open bags are in little containers, to avoid spills. I peel only little part of the canvas as I go along, like 2in x 2 in at a time. And when I’m done, all the different colours stay in their different containers. I’m planning to buy the containers pack to keep them in and well separated. I know people that put them all together once their done, and if they’re in need of a specific colours it’s not available anymore because it mixed with others in the same bag.
February 06, 2023
Athena Herrera said:
Hello there I have a question so when you get a diamond art kit of whatever image you want what happens if you lose Symbol chart that they put in the kit for you is there a way to find the Symbol chart for the diamond art painting kit?
January 04, 2023
Patty said:
I’m on my 60th diamond art!. Love it. I give them away as gifts 🎁
October 28, 2022
Kim said:
A tip I found useful is if a part of the canvas does leave it less sticky I use a pritt-stick works really well until u can seal your end result
September 19, 2022
Anna said:
I want make sure correct color pictures thanks , Anna
September 19, 2022
Sarah Gill said:
My canvas is from China or Japan and the dots I have are from diamond dots company. They seem to be bigger than the squares are. So everything is off. How do I get smaller dots?
August 30, 2022
Carolyn said:
After cleaning, roll your diamonds with a rolling pin to make sure they are tight.
August 30, 2022
Martha said:
I have a small magnifying glass with a light that I use when I have problems identifying the letters/numbers. Works great.
August 30, 2022
Diane Fulbrook said:
August 01, 2022
Diane Fulbrook said:
As soon as I get my painting I take the color list and a felt pen and write the bag number and color symbol on each bag of beads. . Then pop them in order in a small tray or box their size. So easy to pick out the color needed by reading the chart on the picture. Luckily some pictures come with this done for you. Just need to cut them apart. On my 20th picture. Love it.
August 01, 2022
Marcia said:
Like many here I am hooked , I have completed 5 in 3 months,my question is how to keep the edges even & straight please..I have seen video `s of rulers that you can buy , but they didn`t look too successful to me ,..
August 01, 2022
WANDA said:
My daughter Has OCD & she . I got a Olaf too try ,one look & asked her if she could try too do it BOY she did great I did use a spray on it no hardship for her so she got a large peacock too do for my birthday it took her 6 mouth todo & came out great & the frame was so great with it so we got more . I am trying to do them can’t wait for getting some Christmas one I am going to try a frosting picture hope it will be great. But I read all the tips so we will see ! ty all for your tips I am sure I will be able to do them & others will see how it goes thank you all for all the tips !!!!!!!
July 13, 2022
Diane Fulbrook said:
My fingers were getting sore with the pen so I started using the tweezers to place the diamonds and foumd it also easier to get them sitting right, Also my husband makes my frames out of floor edging. They can be narrow or thicker, what makes you happy. The plastic that comes on the picture is one sided. Before you take it off mark the right side up. The top side will stick to your canvas and take off the glue.
June 09, 2022
Connie Johnson said:
I keep a flashlight on my work station, so if I have trouble reading what a symbol is, I shine it on the symbol so I can read it.
April 19, 2022
Thekli said:
Before framing is it better to sray some glue on it, i mean to stabilise somehow???
April 12, 2022
Shirley Keaster said:
Middle of my diamond painting picture dried up. What is the best way to make it sticky again?
April 04, 2022
Choward said:
I have about 10 so far.very addicting and relaxing. I have found that I have had to make a few changes of the diamonds for it to look right. For instance my mother and baby tigers. They blended in together with no separation so I put some black in and changed the whole looks. I have had to do that in an out five of them so far. Beautiful when done
April 04, 2022
Mary Pate said:
What’s the best way to identify what tile goes somewhere if there’s film over it and unreadable?
April 04, 2022
Betsy said:
So a few things I learned of do.. I cut the plastic cover into strips so I can peel back a small square and when I finish I can put it back over it and use the glue on the outside edge to hold it in place. I just used a hair roller to make sure I got all pet hair off it before sealing it. Worked well and only one diamond came off. Wouldn’t recommend if your diamonds are not sticking. Also I watched a video on sealing and she shook her mod lodge before using. DO NOT shake it. It creates air bubbles and says on it not to shake. And I prefer round drills as they are easier. The square were very hard to line up straight and I couldn’t stand it. But it’s personal preference. I have the same problem as mentions with the round drills being different sizes so in areas of one color I try to alternate between big and little to keep in the color square and that seems to work. And they look very straight. Or I just go for all the big ones. About to seal one of my pictures for the first time and hope I don’t screw it up cause it’s a gift for my son!
November 15, 2021
Amber Burgess said:
Hi my name is amber and I’m addicted to Paint with Diamonds (and ONLY PWD brand…)
I’m on my 3rd custom canvas and a 4th is on the way. I do these as wedding gifts for close friends and family. I have a few tips for you!
1) I got my first 45×60 framed by Hobby Lobby. I chose a pricey frame and a colored border around the canvas. It ran me $178 but it was worth it!
2) I’ve noticed so far that the custom canvas’ drills are the same (symbol and manufacturer code) but different from the canvasses that are already made. And those drills are the same as other pre-made pictures. I hope that makes sense. The canvas art coming from China are all the same as other att coming from China and the USA art drills are the same as other art coming from the USA
3) If your canvas isn’t sticky,
you can use Modge Podge to make it sticky again.
4) Use masking/painters tape on the sticky border around your picture to keep it clean and keep your arm from sticking to it.
5) the round end of the tweezers comes in handy for lining up the drills in rows and around the outside edge of the picture.
6) When doing a custom PWD, you can purchase extra photoshop. When you choose this, a person (Cheryl Hope) helps you and communicates via email with the options, tips, and recommendations for your final product before your order starts making your order. She’s great at what she does and never disappoints!
7) When placing an order for a custom PWD, SIZE DOES MATTER! The bigger the canvas, the clearer the final product! And choose images that aren’t dark. The colors blend and do not cove out very good.
8) AND MOST IMPORTANTLY!!! Have fun and stay active in the PWD family! You will be back for more, that’s a fact! 🥴🤪
I hope these tips and recommendations come in handy! Welcome to the PWD family!! Enjoy this addiction!!
October 07, 2021
Alice Leonard said:
I have done about 8 pieces love doing this hobby, but how do I frame them?
September 07, 2021
Kathleen said:
I have done several diamond art pieces. Some I don’t frame because I don’t like them when completed. The problem I continually have is that after completing a section I run my hand back over the piece and some of the dots are popping up. I run the roller several times but continually some just don’t stay down. I keep the piece covered at all times, I only uncover a small section at a time to work on. I have tried to also gently turn the piece over and roll both sides. I have tried to use the “triple thick” after completion and some dots pop up before the glue is set. Any recommendations?
June 21, 2021
Diana said:
I haven’t tried it but they SLIME (the kids toy) is good for cleaning up crumbs, dirt and other debris from your canvas.
June 21, 2021
Kira Colard said:
If the stickey isnt working, i use a hair dryer. Makes the glue sticky again. & for sealing i use polycrylic protective finish-clear. Works great. My diamonds have stopped falling off after i finish.
June 02, 2021
Teresa said:
I have crumbs in the fi ished part of my diamond painting what is the best way to clean it up?
May 17, 2021
Terri H. said:
I’ve just started DP about 3 months ago and starting my 4th one. Just a couple of issues so far. With my last one the adhesive peeled off the painting and stayed with the cover. Canvas not sticky at all. Luckily my hubby was able to figure it out. Once I made sure was not peeling both layers all was good. Other problem is, I sort my drills by DMC number and I’ve found dye lots don’t always match from one project to the next. Don’t combine them til you check.
May 17, 2021
Hailey said:
Thanks for the tip i really needed it and i have experienced 1 of those problems. I sorta spilled the diamonds every wher and my dog almost ate some of them it wasn’t the best experience but at least my dog didn’t eat them-
April 06, 2021
Marcia Reisinger said:
Sometimes the cover sheet will stick to the glue and its hard to get it up, so I use Parchment paper, works fine, Thank you for Diamond Painting.
March 26, 2021
Laurie said:
Go on YouTube. There’s hundreds of channel’s on diamond painting.
March 17, 2021
Heidi. K. Seelhoff said:
My. Diamonds. Are. Not. Sticking. To. My. Canvas. Very. Well. I’ve. Had. This. Problem. Ever. Since. I. Started about. 2. Months. Ago I’ve. Never. Done. Any. Before. So. I’m. Very. New. I. Love doing. It. A,lot. But. The. Problem. With. Not. Sticking. Is.leaving. me Very. FRUSTRATED. I’ve. Heard. Some. People. Dont. Like those pink wax I. Dont. Know. If. That’s. My. Problem. I’ve. Heard. Some. People like to. Use. Blue. Tak. Where. Do. I. Find. It. None. Of. My. Stores. Have. It. Walmart or. Joana.ns. I. Shop. On. Amazon. Quit. Often. That’s. Where. I. Get. Most. Of. My. Diamond. painting. Supplies
March 17, 2021